For garden lovers, spring, and the chance to garden, can feel like an eternity away when we’re knee deep in winter, but it doesn’t have to be that way. It’s easy to indulge your passion for planting, indoors, with a terrarium.
A little history about terraria: around 1829, English doctor Nathaniel Bagshaw Ward, who had an interest in entomology, had saved a specimen of a sphinx moth chrysalis in a glass jar that contained a bit of soil. A week or so later, he saw that tiny ferns and grass seedlings had begun to sprout in the soil. He observed that evaporated moisture condensed on the wall of the glass bottle during the day, and dripped back down into the soil at night, keeping a humid environment within the glass container.
Ward’s curiosity about how long the ferns could survive in this sheltered environment led to a groundbreaking botanic and economic discovery of the Victorian age – the Wardian Case. These hermetically sealed cases were used to introduce plants to the British colonies, transporting specimens from as far away as Australia.
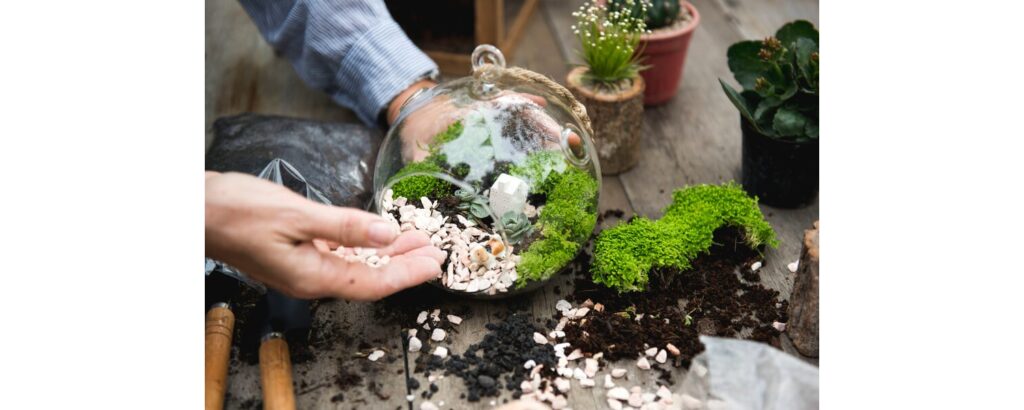
By definition, a terrarium is a sealable glass container that houses soil and plants, that can be opened to access them, but terraria can also be open to the surrounding environment. Anyone can create a terrarium with just a glass container, some kind of drainage layer, soil and plants. The imagination you bring to the creation of your terrarium design is where the fun really begins! Here are the 5 simple steps you need to start your terrarium:
1. Choose a Container – Based on the type of plants you choose, you can either opt for a closed or opened container. Glass is preferable, and you’ll want to find something that has a wide mouth for easy access to your plants. At the high end, you can choose a classic Wardian case – the kind you would have found in the finest Victorian homes for your terrarium. On the flip side, you can use whatever you find around the house – mason jars, fish bowls, glasses – the choice is yours. Just make sure that the container you select is wide enough so your plants have enough space not to touch the glass.
2. Create a Drainage Foundation Layer – Because your glass container won’t have any drainage holes, it’s important to create a drainage layer for your terrarium. Small pebbles, aquarium gravel or glass beads would all work.
3. Add a Layer for Odor Control – On top of your drainage layer, adding a layer of activated charcoal will help control odor by fighting bacterial growth as well as helping to prevent root rot. Activated charcoal contains ash, which helps with both drainage and odor control. You can find activated charcoal at a garden center or pet supply store. You can also add a layer of soaked, sphagnum peat moss, which is naturally resistant to bacteria.
4. Add the Soil – Standard, bagged potting soil is fine for your terrarium, but you can also find packaged soil for terrariums at your local garden or pet center (often used for reptile tanks). Terrarium soil is typically an equal mix of sand, peat moss and sterilized garden soil, with amendments such as vermiculite for water retention, perlite, a natural volcanic element that helps increase air circulation around the delicate roots systems of your plants, and sphagnum peat moss for bacterial control.
Note: If you are creating a terrarium with succulents, opt for an open container so there will be less humidity and add coarse sand to the potting mixture for even more drainage.
5. Add Your Plants – Some basics:
- If you choose a closed container environment, select plants that thrive in high humidity.
- Open container terrariums can offer a little more plant selection flexibility.
- Plants that do well in low light are a good choice since you’ll want to place your terrarium away from direct sun (you can cook your plants otherwise!)
- Select plants with similar environmental needs, so you’re not putting a plant that needs a lot of moisture next to one that prefers a drier home.
Although terrariums are essentially self-contained environments, where you place your terrarium in your own home has a “climate” of its own. Here are some plant options to consider based on a space’s temperature and humidity:
- Warm/Dry – Air plants (called Tillandsia) are the ultimate in low-maintenance plants. They absorb the little moisture they need from the air around them. Cacti are a natural choice for dry environments, and come in a variety of forms and colors to help you create a beautiful terrarium. Succulents like Hens and Chicks are perfect to tuck into tiny spaces, adding color and texture. Finally, herbs like thyme, creeping thyme and oregano are hardy and will add fragrance to your room as well.
- Cool/Dry – Tillandsia are a good choice here again, as are Pincushion plants (Nertera granadensis) which do best at temperatures no higher than 70 degrees Fahrenheit with a decent amount of light to encourage the beautiful, orange berry growth, instead of just the plant’s leaves.
- Warm/Humid – This is the natural environment for terraria, so you’ll have a lot of options here. Ferns are terraria staples, as are Baby Tears and African Violets. Carnivorous plants do well here, too, so indulge your passion for Venus Flytraps, Sundews and Pitcher Plants. (Bonus: a carnivorous terrarium in your kitchen can help control fruit flies!) Other pretty plant picks include Watermelon Peperomia with its lovely, variegated, fleshy leaves, the beautifully patterned Nerve Plant and richly textured Friendship Plant.
- Cool/Humid – Mosses and lichen such as Pixie Cups (Cladonia pyxidata) are perfect, as are any miniature ivies. You can even experiment with small bulb flowers such as Muscari and crocuses as centerpieces for your terrarium.
Create your terrarium by adding your largest plants first, then fill in around them with your smaller plants. Leave enough space to add creative touches to your terrarium like pieces of sheet moss, decorative stones, seashells, and even small figurines for fun!
While you shouldn’t need to water your terrarium very often, monitor its soil to ensure it doesn’t dry out. If you’ve created a closed-lid terrarium and water is dripping down from the top, open the lid to let some of the moisture evaporate and add some air circulation. Remove wilted or dead leaves and plants as soon as you see them.
And there you have it! Get your creativity going and your (indoor) garden growing with a terrarium. And don’t stop at just one!
Main Image Photo Credit: https://www.mnn.com

Image Credit: https://daily.jstor.org